How to Keep the Same Character in AI Images: Screen Sets with Character Asset Pack
Learn how to keep the same face, outfit and weapons across AI images: create a screen set of your character in several poses with Character Asset Pack, choose the right model and settings, and save it as a named character you can use as a tag.

The video starts at 02:32, where this lesson begins. Watch the full 27:09 tutorial.
In this part of the video
The hardest problem in AI storytelling is consistency. Generate “a blonde warrior” ten times and you get ten different women. For a film, your hero must look the same in every shot: the same face, the same clothes, the same sword. In Proxima Art this is solved by Character Asset Pack. You give it one image, it draws your character from several angles — a screen set — and you save the result as a character with a short name. From then on, that name works as a tag in your storyboard.
What is a screen set?
A screen set is a single reference board: your character in several poses and camera angles, with a consistent face and outfit. Film and game studios call this a model sheet. For the AI it is a useful reference, because it shows what the character looks like from the front, the side and the back — information a single portrait does not have.
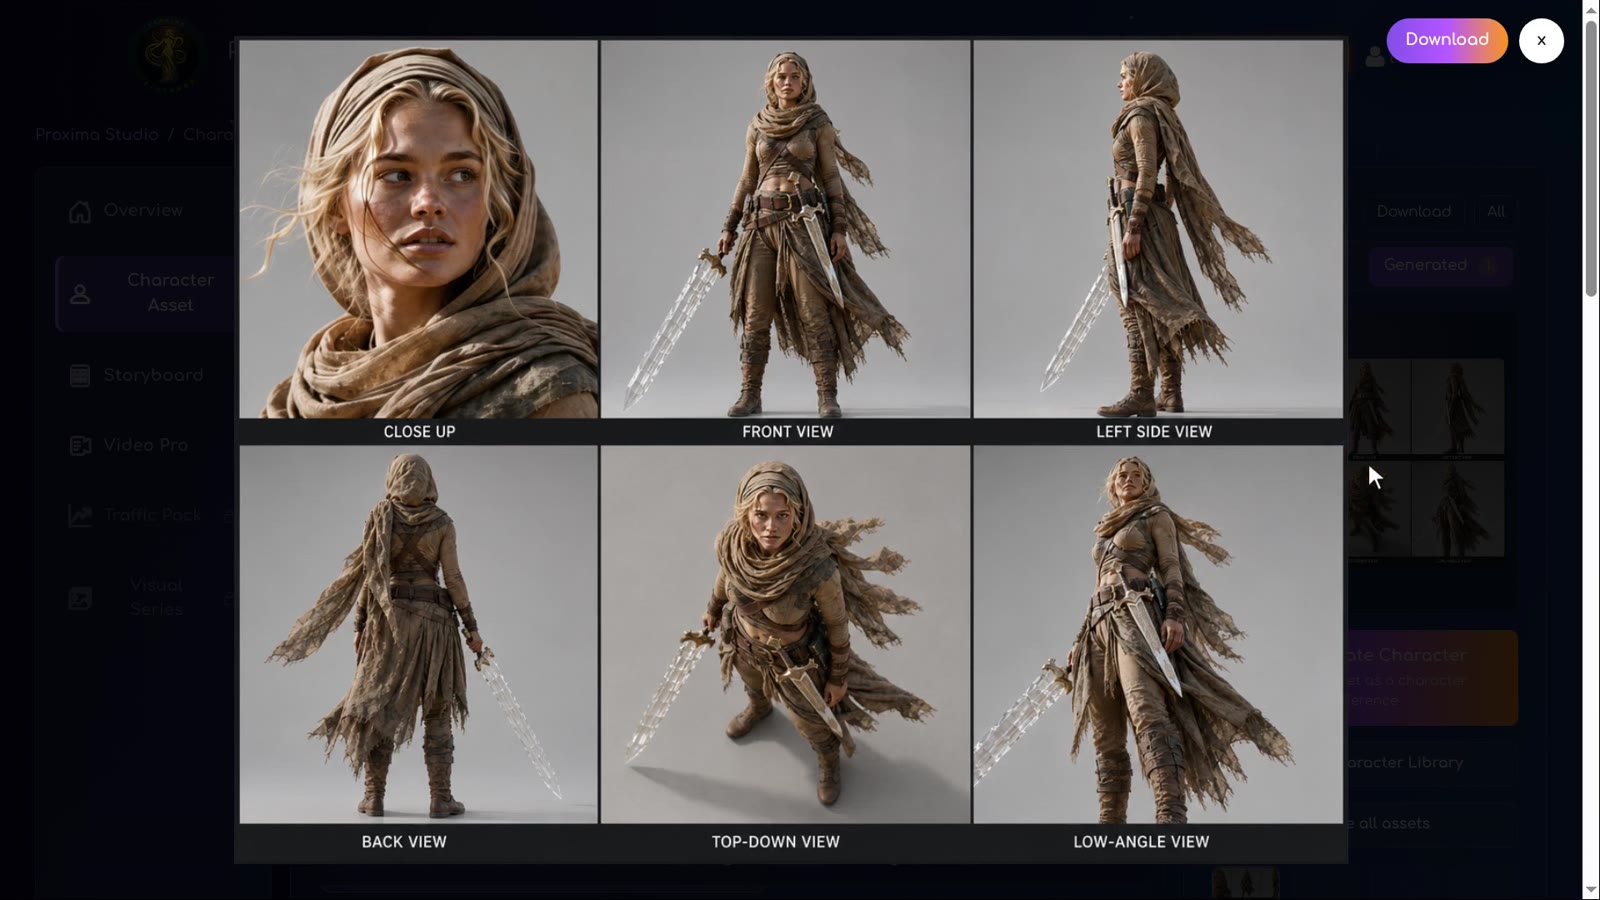
Opening Character Asset Pack
Open Proxima Studio (Create menu). You will see tool cards such as Character Asset Pack, Storyboard and Video Pro Generator. Click Create Character Pack. The form is numbered from top to bottom, and the right column, Asset Preview, shows examples and later your generated results.
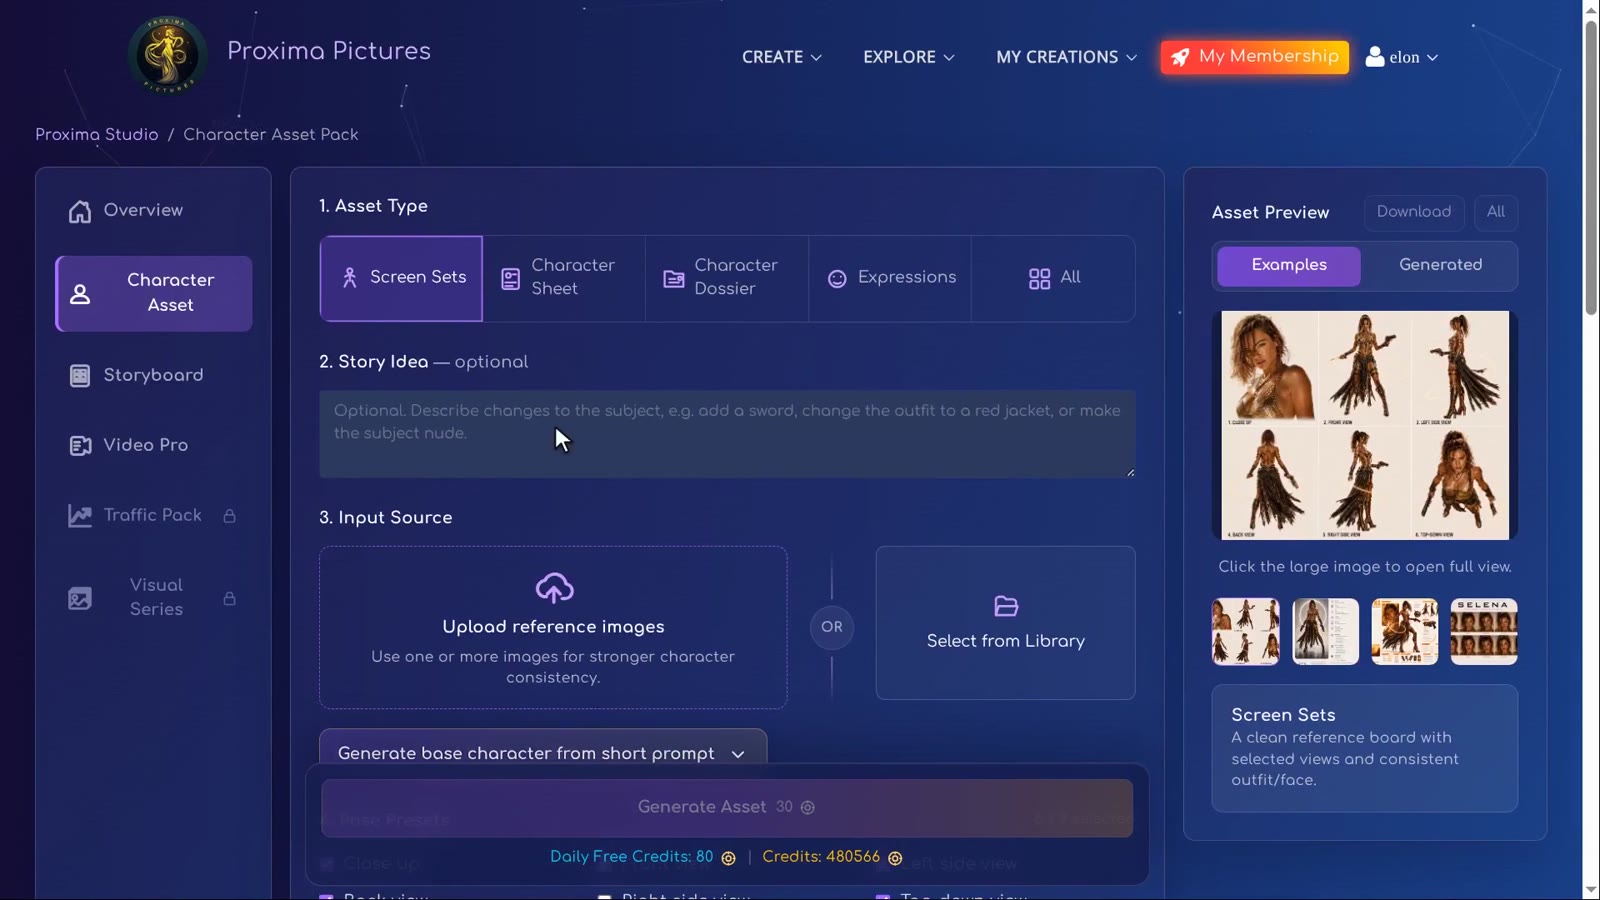
1. Asset Type
Character Asset Pack can create five kinds of assets:
- Screen Sets — a clean reference board with selected views and a consistent outfit and face. This is what you need for the storyboard.
- Character Sheet — a hero render with readable story, traits, skills and equipment.
- Character Dossier — a poster combining poses, stats, story and equipment panels.
- Expressions — a grid of consistent emotional expressions and head angles.
- All — the full pack: poses, sheet, dossier and expressions in one run.
2. Story Idea (optional)
A short description helps the model see the bigger picture and can change details of the subject — for example add a weapon or change the outfit. For the first heroine the video uses: “A beautiful 25-year-old blonde warrior with European features. She wears practical nomadic clothing and carries an ornate dagger and a large translucent crystal sword.”
3. Input Source
Add a reference: Upload reference images from your device, or Select from Library to pick an image you generated earlier. One clear image is enough; more images of the same character can make it even more consistent. If you have no image yet, Generate base character from short prompt creates one from a few words.
4. Pose Presets — which poses can you choose?
There are nine poses. Six are selected by default:
- Close up, Front view, Left side view, Back view, Top-down view, Low-angle view (default)
- Right side view, 3/4 front left, 3/4 front right (optional)
The default six cover what a film needs: a face close-up for emotional shots, full-body views from three sides, and two dramatic camera angles.
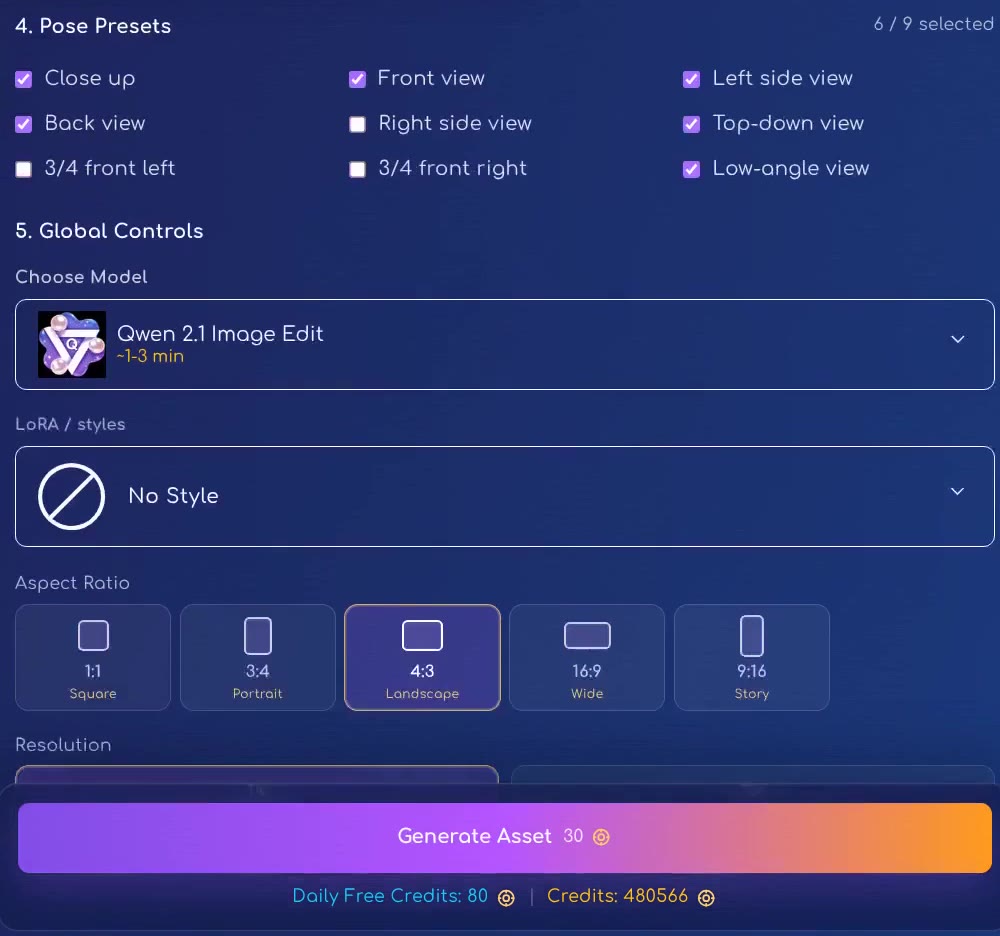
5. Global Controls: model, style, format and resolution
This is where quality is decided. The model list offers:
| Model | What to know | Screen set price |
|---|---|---|
| GPT Image 2 Edit | Usually the best screen sets. Two modes: Light (good quality, more permissive, but long delays and downtime are possible) and Medium (balanced detail, faster, much stricter moderation). Takes 2–5 minutes. | 65 credits (1K), ×2 for 2K |
| Qwen 2.1 Image Edit | The default and the best alternative when GPT Image 2 refuses your character. Up to 10 reference images, native 2K, 1–3 minutes. Optional LoRA styles. | 30 credits (1K), 50 (2K) |
| Krea 2 Image Edit / Proxima Aurelia 2 | Screen sets only, with a Reference Boost slider: higher values follow the reference more closely but edit less. Best in 4:3 or 16:9. | 20 credits |
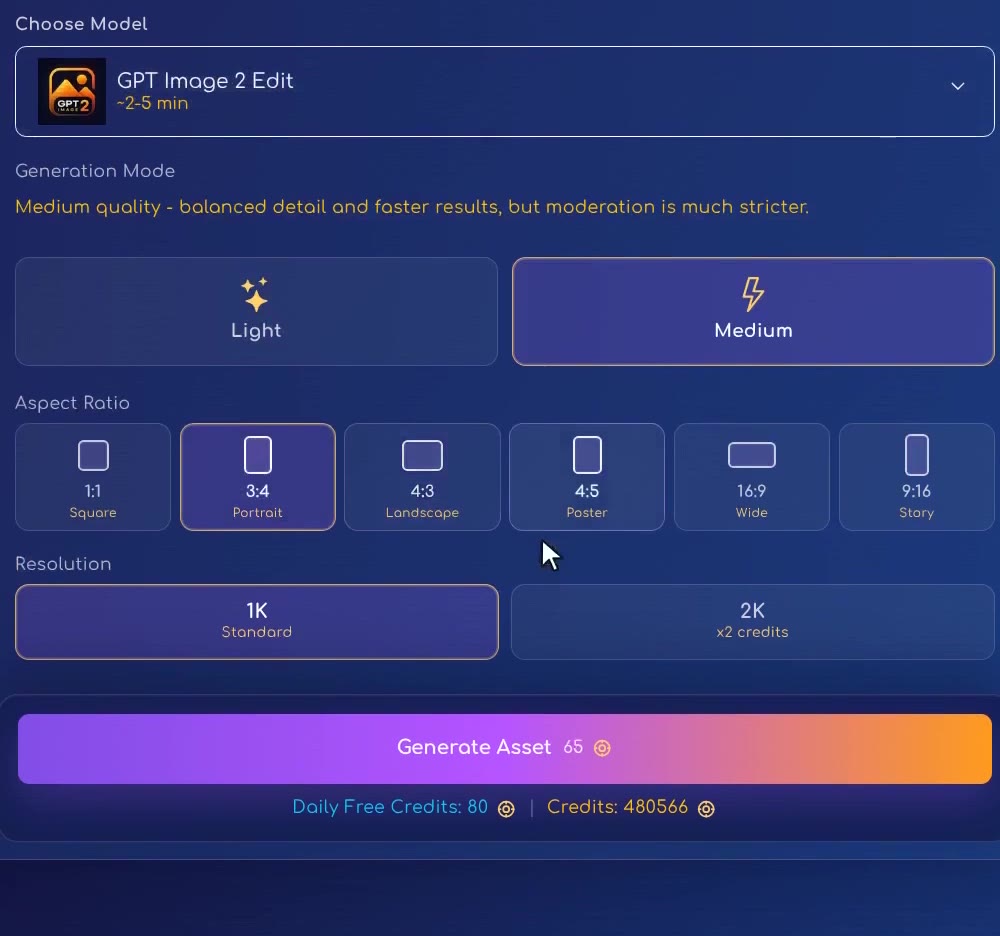
Our recommendation: start with GPT Image 2 Edit. Because of its moderation it does not draw everything — if it blocks your character, use Qwen 2.1 Image Edit, keep the default settings (No Style) and choose 4:3 Landscape. A landscape board gives six poses enough room.
The aspect ratio options are Square (1:1), Portrait (3:4), Landscape (4:3), Poster (4:5, not available for Qwen), Wide (16:9) and Story (9:16). Resolution is 1K or 2K; 1K is enough for a storyboard reference.
From screen set to named character
When the screen set is ready, open it full size and check the details: the face, the outfit, the weapons. If you like it, click Add / Create Character. For your first character, the creation form opens right away:
- Character name (required) — short, without special characters. It becomes the tag you use in Storyboard prompts; the dialog shows a live Prompt tag preview, for example
{iraya}. - Primary media — which original reference becomes the main image of the character.
- Notes — optional, only for you.
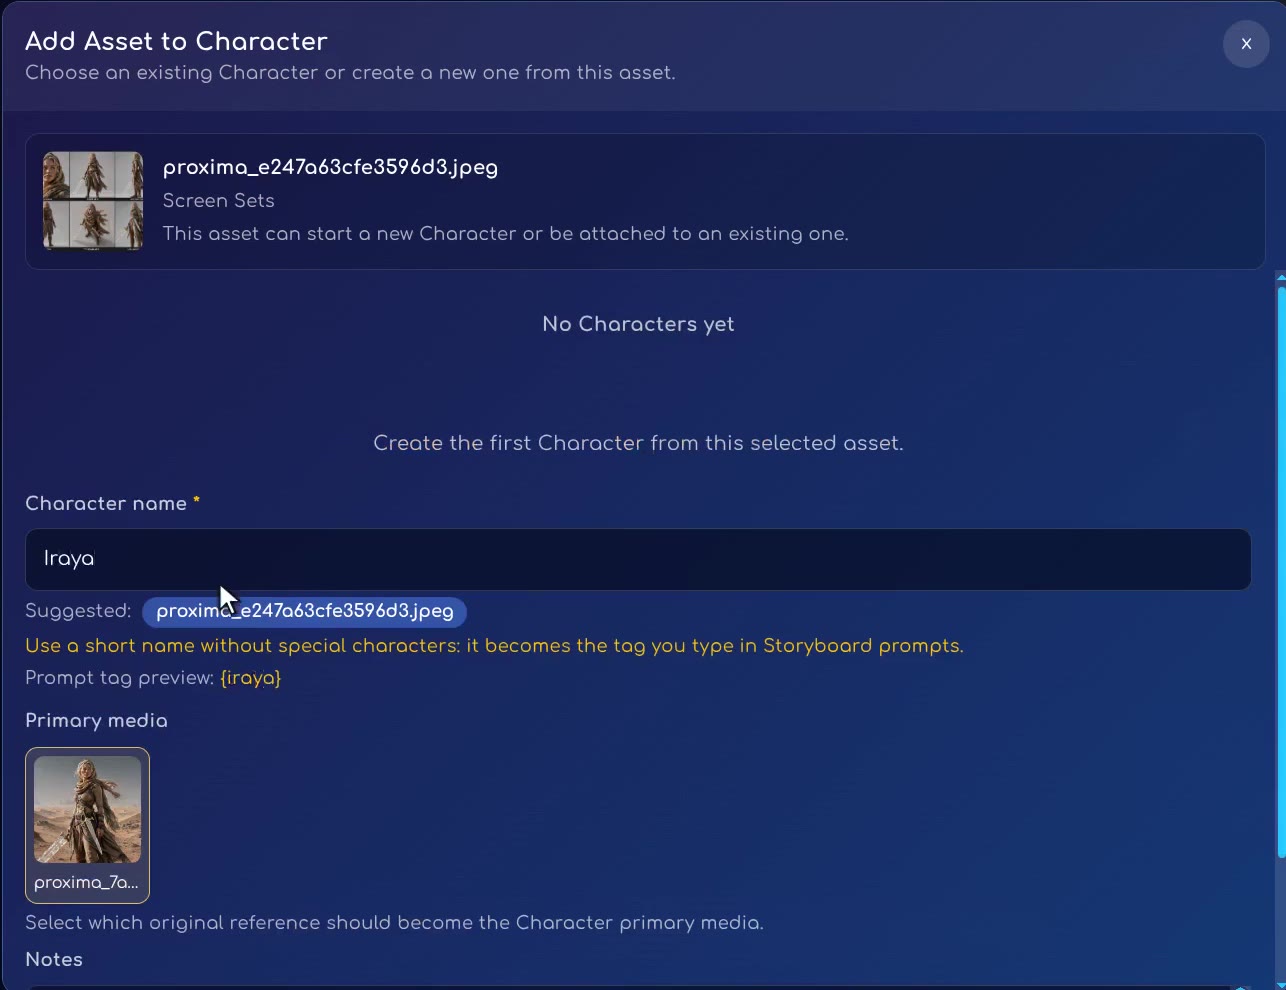
Once saved, the character appears in your Character Library. When you later write {iraya} in a storyboard panel, Proxima adds her description and reference images to the generation automatically — you never have to describe her again.
Creating a second character
For the companion, Ashara, the process is the same with three important differences:
- Remove the previous reference before adding the new image. Otherwise the old reference distorts the new screen set.
- Write a new story idea: “A beautiful 25-year-old Black warrior woman with deep brown skin. She holds a long diamond-crystal spear with a sharp black obsidian tip.”
- When saving, choose Create New Character instead of Use Existing Character, so the screen set is not attached to Iraya.
Use Existing Character is useful later, when you want to add more assets (for example an Expressions grid) to a hero who already exists.
Step by step
-
Open Character Asset Pack
Go to Proxima Studio and click Create Character Pack, or open Character Asset in the Studio sidebar.
-
Choose Screen Sets
In 1. Asset Type select Screen Sets: a reference board with your character in several poses.
-
Describe the character
In 2. Story Idea (optional) write one or two sentences: age, look, clothing and what the character carries.
-
Add one reference image
In 3. Input Source upload an image or click Select from Library and pick the image you generated. One clear image is enough.
-
Choose the poses
In 4. Pose Presets keep the default six (close up, front, left side, back, top-down, low angle) or tick the ones you need.
-
Pick the model and format
In 5. Global Controls choose GPT Image 2 Edit for the best result, or Qwen 2.1 Image Edit if your character is blocked by moderation. Keep the default settings and use 4:3.
-
Generate the asset
Click Generate Asset; the price is on the button. The screen set appears under Asset Preview, Generated.
-
Create the character
Click Add / Create Character, type a short name without special characters, check the tag preview and save.
-
Repeat for the next hero
Remove the previous reference first, add the new image, generate, then choose Create New Character.
Tips
- Start from a clean full-body image. A single character on a simple background gives the best screen set.
- Mention props in the story idea. Weapons and accessories you name are more likely to appear in every pose.
- Keep names short and unique: Iraya, Ashara, Kai. Short tags are easy to type and impossible to confuse.
- A storyboard needs at least one character with a screen set, so do this step before you start the storyboard.
Common mistakes
- Leaving the old reference in place — the new character inherits the old one's face.
- Adding a new hero to an existing character — always choose Create New Character for a new person.
- Long names with spaces or symbols — they make clumsy tags. Use one simple word.
- Retrying the same refused prompt — if GPT Image 2 Edit blocks it, switch to Qwen 2.1 Image Edit instead.
With two named characters ready, you can start the storyboard in the next lesson.
How we used this in Sleeping Sands of Kharuun
At 02:32 the tutorial makes the screen set for Iraya, then saves the named character at 03:48. At 04:15 it repeats the process for Ashara. The reference boards provide views of the same face, outfit and weapons, so the storyboard can use the characters repeatedly rather than starting from unrelated portraits.
Iraya carries the crystal sword and Ashara the spear. Those props matter later: when they disappear in a generated video, the continuation prompt must explicitly preserve them. A screen set supports consistency; it does not guarantee that every later frame will preserve every object.
FAQ
What is a screen set?
A screen set is one image that shows the same character from several angles — for example close-up, front, side, back, top-down and low-angle views. It works as a model sheet: the AI sees the face, outfit and props from every side and can keep them consistent in new scenes.
How do I keep the same character in all my AI images?
Create the character once in Character Asset Pack from a clear reference, turn the screen set into a named character, then use its tag (for example {iraya}) in storyboard prompts. The tag brings the description and the reference images into every generation.
Which model is best for a screen set?
GPT Image 2 Edit usually gives the best screen sets. It has strict moderation and may refuse some characters; in that case use Qwen 2.1 Image Edit with the default settings and the 4:3 format.
How much does a screen set cost?
With Qwen 2.1 Image Edit a screen set costs 30 credits in 1K or 50 in 2K. With GPT Image 2 Edit it costs 65 credits in 1K, and 2K costs twice as much. The Generate Asset button always shows the price.
Why do I need a character name?
The name becomes the tag you type or click in Storyboard prompts, so keep it short and without special characters: Iraya becomes {iraya}.
What if my second character looks like the first one?
You probably left the first reference image in the form. Remove it before adding the new image, and save the result with Create New Character so it is not attached to the first hero.
Try it yourself: Character Asset Pack
Turn one image into a consistent, reusable character.All lessons in this tutorial
- 01:14 Lesson 1 · Generate your heroes, beast and world
- 02:32 Lesson 2 · Make consistent characters with Character Asset Pack
- 05:10 Lesson 3 · Set up the storyboard and let AI write the panels
- 07:30 Lesson 4 · Edit panels with tags, Craft and versions
- 10:17 Lesson 5 · Write your own prompts and compose the board
- 13:17 Lesson 6 · Turn the storyboard into your first video scene
- 16:07 Lesson 7 · Chain scenes into one continuous film
- 21:01 Lesson 8 · Reveal the sandworm, refine details and download