Make a Consistent-Character AI Film from Your Phone — Full Proxima Art Storyboard Tutorial

26 chapters
- 00:00Teaser — Sleeping Sands of Kharuun
- 00:57Made in Proxima Art
- Lesson 1 · Generate your heroes, beast and world
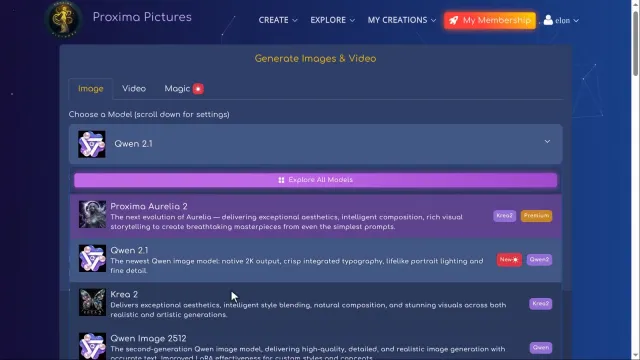
- 01:14Lesson 1 · Generate your heroes, beast and worldChoosing a model & first heroine with LoRAs
- 01:57Second heroine, the beast and the world
- Lesson 2 · Make consistent characters with Character Asset Pack
- 02:32Lesson 2 · Make consistent characters with Character Asset PackCharacter Asset Pack: Iraya's screen set
- 03:48Creating the first character
- 04:15Second character: Ashara
- Lesson 3 · Set up the storyboard and let AI write the panels
- 05:10Lesson 3 · Set up the storyboard and let AI write the panelsStoryboard setup: panels, characters, visuals
- 06:05Image model, Light mode & GPT style LoRA
- 06:41Enhance Storyboard: AI writes the panels
- Lesson 4 · Edit panels with tags, Craft and versions
- 07:30Lesson 4 · Edit panels with tags, Craft and versionsPanel tools: tags, lock, editor & Craft
- 08:43Drawing panels & switching versions
- 09:08Fixing a panel with precise instructions
- Lesson 5 · Write your own prompts and compose the board
- 10:17Lesson 5 · Write your own prompts and compose the boardWriting your own prompts with tags
- 11:43The big reveal: mountain becomes a sandworm
- 12:35Last panel & composing the board
- Lesson 6 · Turn the storyboard into your first video scene
- 13:17Lesson 6 · Turn the storyboard into your first video sceneFrom storyboard to film: video settings
- 14:15Scene A1: video mode & Minimax prompts
- 15:38Regenerate, Chain so far & confirming scenes
- Lesson 7 · Chain scenes into one continuous film
- 16:07Lesson 7 · Chain scenes into one continuous filmScene A2
- 17:19Scene A3 & the first chain
- 18:56Scene B1: scale and continuity
- Lesson 8 · Reveal the sandworm, refine details and download
- 21:01Lesson 8 · Reveal the sandworm, refine details and downloadScene B2: the sandworm rises
- 22:42Scene B3: final close-up & fine detail
- 25:05The whole film
- 26:35Download in 2K & final thoughts
Build a complete AI short film in Proxima Art, even from your phone: create two consistent heroines with Character Asset Pack, plan six storyboard panels with tags and the Craft prompt helper, then animate every panel into 2K Minimax video scenes and chain them into one film.
Key takeaways
- Character Asset Pack turns one reference image into a screen set and a reusable, named character you tag in storyboards.
- Panels mode gives the most control: 6, 9 or 16 panels, each with its own prompt, lock and up to 6 versions.
- Enhance Storyboard writes all panel prompts from a short story; Craft refines any single prompt with full context.
- Each panel becomes a video scene of up to 15 s with Minimax; confirm a scene with the tick before the next one continues from it.
- "Chain so far" previews the whole film at any point, and the finished film downloads in 2K.
Lesson guides
Every part of this video as a written step-by-step guide
 01:14
1:18
Lesson 1
Generate your heroes, beast and world
Pick a model, set it up and add LoRAs to create the heroes, creature and world of your film. Read the guide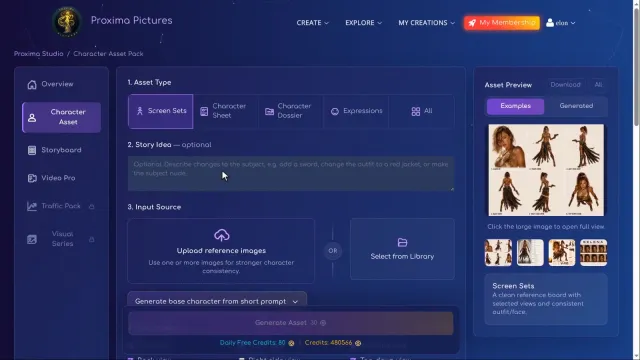 02:32
2:38
Lesson 2
Make consistent characters with Character Asset Pack
Turn one image into a screen set of poses and a named character you can reuse in every scene. Read the guide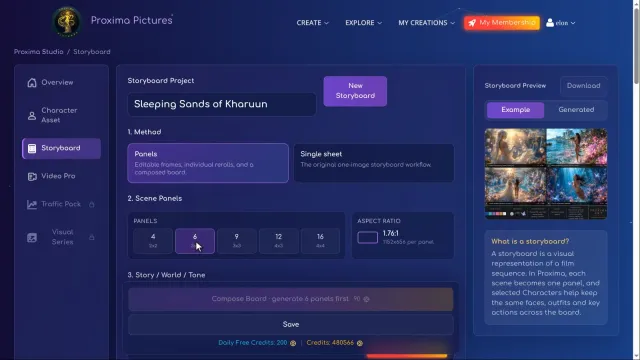 05:10
2:20
Lesson 3
Set up the storyboard and let AI write the panels
Choose panels, characters and visuals, then let Enhance Storyboard write a prompt for every panel. Read the guide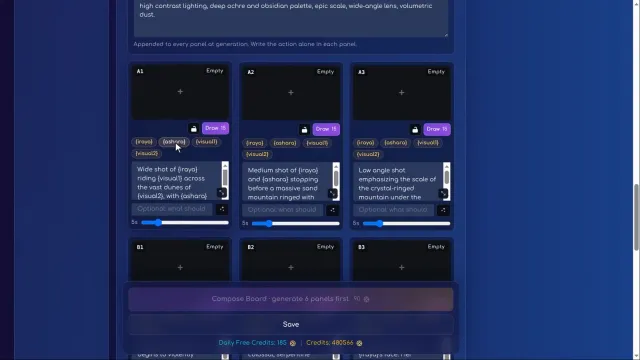 07:30
2:47
Lesson 4
Edit panels with tags, Craft and versions
Learn what each panel control does and fix a shot without rebuilding your storyboard. Read the guide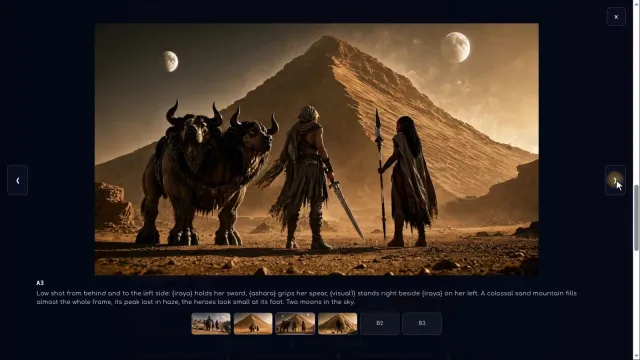 10:17
3:00
Lesson 5
Write your own prompts and compose the board
Describe clear shots, reveal the sandworm, then assemble all six panels into a storyboard. Read the guide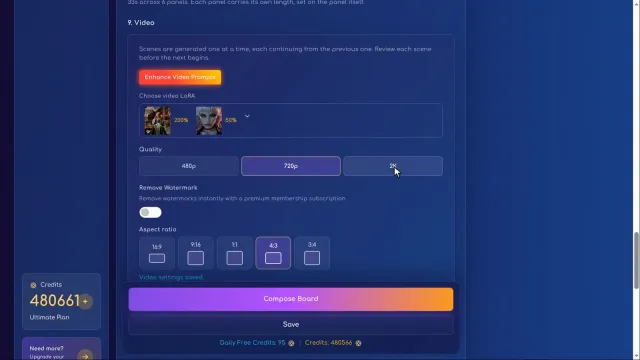 13:17
2:50
Lesson 6
Turn the storyboard into your first video scene
Set video quality, describe camera movement with Craft and confirm your first scene. Read the guide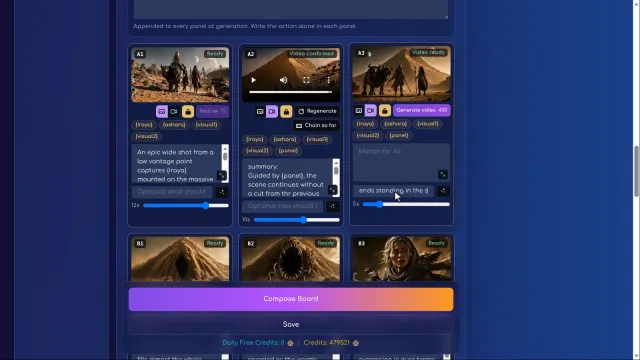 16:07
4:54
Lesson 7
Chain scenes into one continuous film
Continue from approved scenes, check the joined film and fix missing objects before moving on. Read the guide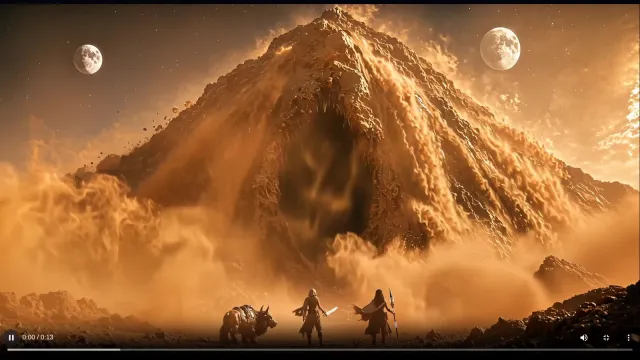 21:01
6:08
Lesson 8
Reveal the sandworm, refine details and download
Build the transformation, repair the final shot and review the finished film before downloading. Read the guideTry it yourself
Character Asset Pack
Shown at 02:32Turn one image into a consistent, reusable character.
Storyboard
Shown at 05:10Plan your film panel by panel with AI-written prompts.
Video generator
Shown at 13:17Animate images and prompts into video scenes.
100 free credits every day — no card needed.
FAQ
Can I make an AI film on Proxima from my phone?
Yes. The whole film in this tutorial was made in the browser, and every step works on a phone or a desktop.
How much does a storyboard image cost?
With Qwen 2.1 in Light mode each panel image costs 15 credits. You can redraw a panel and switch between up to 6 versions.
How do I keep characters consistent across scenes?
Create each hero once in Character Asset Pack, save it as a character with a short name, then insert its tag in panel prompts. The tag brings the description and the reference image into every generation.
How long can one video scene be, and in what quality?
Up to 15 seconds per scene, from 480p up to 2K, generated with the Minimax video model. 480p fits into the free daily credits; 720p, 1080p and 2K cost more credits. A few frames are used to join scenes, so the finished film is slightly shorter.
Why can't I generate the next scene?
Each scene continues from the end of the previous one, so confirm the previous scene with the tick first.
Is it free to try?
Yes. You get 100 free credits every day, and that is enough to generate video in 480p. Higher resolutions (720p, 1080p, 2K) cost more credits, so for those a subscription or a credit pack is the way to go.
Full transcript
Read the full transcript (≈ 2,700 words)
00:57 Made in Proxima Art ▶ play from here
This entire film was made in Proxima Art. You can do it right from your phone. Over the next 25 minutes, I'll show you exactly how, from the first character to the final scene.
01:14 Choosing a model & first heroine with LoRAs ▶ play from here
Welcome to Proxima Art. Today, I'll show you how to work with characters and the storyboard. We'll create a few character images and visuals for our film, Sleeping Sands of Kharuun. We have a wide variety of AI models available, but I'll be using Qwen 2.1 for this film.
Feel free to choose whichever model you prefer. Let's create a first draft of our main character. A beautiful blonde warrior from the planet Kharuun. Let's add a few LoRAs.
Think of them as small add-on models that bring capabilities the base model doesn't have on its own. Let's generate and see what we get. And here she is. Our first warrior of Kharuun.
01:57 Second heroine, the beast and the world ▶ play from here
Now let's create a second heroine using the same settings. Meet another daughter of Kharuun. Next, the creature our warrior will ride. We only need it as a reference for now.
One last piece, the world of Kharuun itself. We'll use it as a visual in the storyboard.
02:32 Character Asset Pack: Iraya's screen set ▶ play from here
Next, we'll show our character in different poses. For that, we choose Character Asset Pack.
Let's start with the story idea. It's optional, but it helps the model see the bigger picture. For our first heroine, something like this. A beautiful 25-year-old blonde warrior with European features.
She wears practical nomadic clothing and carries an ornate dagger and a large translucent crystal sword. Next, we need a reference image. You can upload one or pick it from your library. Our images are already there, so let's use the library.
One image is enough. We'll keep the rest of these settings at their defaults. GPT Image 2 is usually the best choice. If it gets blocked by censorship, if you need NSFW, or if you just want to play with styles, go with Qwen 2.1.
We'll use 4:3, but other formats work too.
And here is the screen set of our first character.
03:48 Creating the first character ▶ play from here
Now let's turn this screen set into a character. This is our first character, so the form for a new one opens right away. Always give it a name, preferably a short one. We'll use it as a tag in the storyboard.
Notes are optional. They're just for you. Congratulations! Iraya is our very first character!
04:15 Second character: Ashara ▶ play from here
Next, let's create a companion for Iraya. This will be our second character. A beautiful 25-year-old black warrior woman with deep, brown skin. She holds a long diamond crystal spear with a sharp, black obsidian tip.
First, let's remove the previous reference. Otherwise, it would distort the screen set for our new character. Again, we pick her image from the library.
For this character, we'll stick with GPT Image 2 as well.
Now let's turn her into a character too. This time we choose Create New Character, so this screen set isn't linked to Iraya. We'll call her Ashara. Ashara is ready! Next step, the storyboard.
05:10 Storyboard setup: panels, characters, visuals ▶ play from here
Let's give our project a fitting name. Sleeping Sands of Kharuun. There are two ways to build a storyboard. Panels or single sheet.
We recommend panels. You get more control, and your video can be much longer. Our story is short, so six panels are enough. For longer videos, go with 9 or even 16.
Here you describe what you want to see, in a few words and in any language. But first, let's get everything ready. In characters, pick the heroes you created earlier. We'll take Iraya and Ashara.
Visual references are extra elements. Creatures, worlds, places. Let's add our two-headed beast and the desert world. Give each visual a short description.
It gets inserted automatically wherever the tag is used.
06:05 Image model, Light mode & GPT style LoRA ▶ play from here
This model generates the storyboard images. We'll keep Qwen 2.1. Qwen has two modes, Light and Creator. Both look great.
Light is a bit cheaper, 15 credits per image, so we'll keep it. Just like with the characters, we add a LoRA. One is enough here. GPT style.
Below are the shared style, applied to every panel, and the panels themselves. We'll leave them empty. The built-in AI enhancer will fill them in for us.
06:41 Enhance Storyboard: AI writes the panels ▶ play from here
Now let's write a short story.
Enhance Storyboard will polish it, translate it into English, and split the scenes across the panels. Let's click Enhance Storyboard.
Done! The shared style is filled in, and every panel has its own prompt. The enhancer sometimes adds too many styles. For this video, it's better to remove things like painterly, illustration, or consistent character designs.
Otherwise, they can distort the images.
07:30 Panel tools: tags, lock, editor & Craft ▶ play from here
Let's take a closer look at a panel. The preview shows the panel's image, and later, it's video scene. The padlock locks the panel, so a result you like won't get redrawn by accident. Draw creates the image for this panel.
The number is the price, 15 credits. These are the tags you can use. Click one, and it's inserted right where your cursor is in the prompt. There's no need to describe your heroes or visuals again.
You've already done that. Each tag brings its description and reference image into the final generation automatically. And here is the prompt itself, already written for us by the AI enhancer. The little arrow in the corner opens it full screen.
Here it's much easier to read and edit your prompt. In the field below, you can ask the AI to improve something. It sees the whole context, the prompt, and what every tag stands for. The prompt is already fine, but let's ask for more detail and a clear camera angle, so all our heroes are easy to see. Now click Craft.
Much better. Done saves the changes. By the way, the same request field sits right under every panel if you don't need the full screen. This slider sets the panel length.
It matters mostly for video. Let's make it eight seconds.
08:43 Drawing panels & switching versions ▶ play from here
Now let's generate our first panel. The panel is queued, then rendering. We'll skip the wait. Our first panel is ready!
Now you know how to generate the main images of your story. Not happy with this version? Just change the prompt and draw again. Then arrows appear here, and you can switch between up to six versions.
09:08 Fixing a panel with precise instructions ▶ play from here
Now let's draw the second panel. The prompt here looks good, if a little short. Let's try it as it is.
Hmm, not quite what we wanted. There's an extra person, the beast is missing, and the mountain turned into crystals. First, let's try without the LoRA. A style LoRA adds its own look, and sometimes the model does better on its own.
Back to our second panel. This time, we'll tell the AI exactly what we want. So, Iraya rides her beast, and Ashara walks beside her, both seen from behind, small in the frame, in front of a giant sand mountain, and no crystals. Now, Craft, done, and redraw.
That looks much better, and the first version isn't lost. With these arrows, you can switch between versions. Let's go back to the new one.
10:17 Writing your own prompts with tags ▶ play from here
Now, onto the third panel. In the third panel, Iraya has dismounted. This time, let's skip the AI helper and write the prompt ourselves. First, we clear the old text.
We want a low shot from behind and slightly to the side, with a truly colossal mountain. For our heroes and the beast, we simply click their tags. Let's give them their weapons too. No style words needed. The shared style is added to every panel automatically.
Done, and draw.
Now, the next panel, the same way. The mountain bursts open. It has to look truly gigantic, with our heroes tiny at its foot.
Done, and draw.
Let's see both of them full screen.
Exactly the scale we wanted.
11:43 The big reveal: mountain becomes a sandworm ▶ play from here
Now, the big reveal. The mountain is actually a giant sandworm. This time, we'll use the small request field right under the panel. We just described the change.
The mountain becomes the worm's head. Same colors, with fangs and tentacles, and the same framing as before. The little star button is the same Craft as in the big editor. Let's open the prompt and check what the AI wrote.
Done, and draw.
Let's compare it with the previous panel. The mountain was a sandworm all along.
12:35 Last panel & composing the board ▶ play from here
Only one panel is left. The button at the bottom even tells us, generate one panel first, then we can compose the board. The last panel is a close-up of Iraya's face, full of terror. The prompt is already good, so we'll keep it. Draw.
All six panels are ready, and the button is active now. Let's compose the board. Here is our finished storyboard. Our whole story on one sheet.
13:17 From storyboard to film: video settings ▶ play from here
Now, for the most exciting part, turning our storyboard into a film. The whole storyboard, our characters and visuals, go into every scene as references. First, let's lock every panel, so none of our images get redrawn by accident. Below the panels are the video settings.
They appear as soon as the storyboard is composed. Enhance Video Prompts works like Enhance Storyboard. It writes video prompts for all panels at once, but we recommend crafting each panel separately. You get much more control.
LoRAs here are special effects and styles for your video scenes. Fine detail at 200 adds a little more detail, and feature film camera language at 50 for a more cinematic camera. Quality. We go straight to 2K for the best result, and a widescreen 16:9 format.
Every change here is applied almost instantly, within a second or two.
14:15 Scene A1: video mode & Minimax prompts ▶ play from here
Back to our first panel. See this new camera button? It switches the panel to video mode. Our scene needs a bit more time, so let's set 12 seconds.
And again, the arrow opens the prompt full screen. For video, Craft is a must. Our video model Minimax needs the prompt in its own format. Scene description, shots, timing, subjects and sound. Here's our goal.
The camera moves in on Iraya's face, then on Ashara's. Then it pulls back and circles around them until it follows them from behind. Iraya stays on the beast the whole time, and Ashara walks beside her. In the field below, a short instruction is enough.
Now, Craft. And here is the full Minimax structure. A summary, the shots with timing, and the soundscape. Done, and generate video.
A 2K video takes a while to render. We'll skip the wait.
15:38 Regenerate, Chain so far & confirming scenes ▶ play from here
Not bad at all for our first scene. If a scene doesn't work for you, Regenerate makes a new version. Chain so far plays every scene up to this point, joined into one film. Right now, there's just one scene.
When you like the video, confirm it with the tick. This step matters. The next scene grows out of this one. Its last moments become the starting point.
So the next scene can't be generated until this one is confirmed.
16:07 Scene A2 ▶ play from here
Now panel A2. The camera button switches it to video. This scene picks up right where the first one ends. Iraya and Ashara keep riding toward the giant sand mountain, and the camera follows them.
Let's write that down, using our tags.
Now, Craft. A quick check. Both heroes, the beast, the mountain, and the camera following them. Looks good. Done, and generate video.
But let me increase the time interval to 10 seconds.
That turned out unusual. A world where the landscape itself keeps changing. Let's keep this version and move on to panel A3.
17:19 Scene A3 & the first chain ▶ play from here
For panel A3, we can leave the main motion prompt empty and describe what we want in the field below. The camera moves as Iraya gets off the beast and draws her sword, ending in the pose shown in the image. Now click Craft. We can do all of this right here, without opening the larger editor.
Let's set eight seconds. Some of that time is used for the joining frames, so the resulting video will be slightly shorter. Click generate, skip the wait, and let's watch the result.
This scene turned out well. It captures exactly what we see in panel A3 of the storyboard. Let's keep it. Now let's see how these three scenes look together.
click Chain so far.
That turned out really well.
18:56 Scene B1: scale and continuity ▶ play from here
Next, let's bring panel B1 to life. We'll continue directly from the end of the previous scene, then pull the camera back to reveal the enormous scale of this living mountain. The camera pulls back as a colossal mountain of sand rises before them. Iraya, Ashara, and the beast should look tiny beside it.
Sand pours down its slopes, and a vast, dark opening begins to form inside. We're only hinting at the mouth here. The full reveal comes in panel B2. In the refinement field, we'll focus on camera movement and special effects.
Then click Craft to refine the prompt. Let's set the duration to 10 seconds. Now let's generate the scene and see how that sense of scale comes through.
That looks spectacular, but the characters have lost their weapons. Let's make their actions and the continuity with the previous scene more explicit, then regenerate. Iraya should still be holding her drawn sword, and Ashara her spear. They take a few cautious steps back without turning away from the mountain.
We'll also specify that this continues directly from the end of A3. Let's apply those changes with Craft, keep the duration at 10 seconds, and click Regenerate.
Much better. The transition from A3 is smooth now, and Iraya and Ashara keep their weapons. I approve this version, so I'll click the checkmark to confirm the scene.
21:01 Scene B2: the sandworm rises ▶ play from here
B1 is confirmed, so now we can move on to panel B2. Let's continue directly from the end of the previous scene, keeping Iraya's sword and Ashara's spear. The mountain begins to transform. Its central cavity opens into an enormous maw with long, fang-like teeth around its entire rim, just like in the reference image.
Tentacles emerge from the opening. Then the mountain collapses completely in a cascading avalanche of sand. Revealing a gigantic worm, it rises even higher than the mountain's former summit. We keep the same characters, weapons, lighting, and continuous shot.
In the lower field, let's add transformation and visual effects. Now click Craft to refine the prompt before generating. Let's set the duration to the maximum, 15 seconds, and click Generate. As usual, we'll skip the wait.
Let's watch the result in full screen.
This version looks great. Let's keep it and move on.
22:42 Scene B3: final close-up & fine detail ▶ play from here
We have one panel left. This time, we'll leave the main prompt empty and use only the instruction field below. Let's ask the camera to pull back slightly, revealing Iraya from head to toe, ready for battle, with her sword still in hand.
That should be enough. The panel's image description already provides the scene context. Now let's click Craft to turn this short instruction into a complete video prompt. Let's set the duration to 10 seconds, and click Generate.
Let's watch the result in full screen.
Not quite what we wanted. The giant worm is still visible behind her. She's holding the sword with both hands, and the pose isn't right. The fine details could be stronger too.
Let's try another version. First, we'll increase the detail LoRA. Let's set fine detail to 310%.
This time, let's try a different prompt. We'll place Iraya in the center of a violent sand vortex, with the background completely hidden by dust. She holds her sword in one hand. By the end, the fear on her face gives way to a defiant smirk, ready for battle.
Now let's click Craft, then done, and generate another version. Let's take a look in full screen.
Much better! The pose is right, the background is hidden by the swirling sand, and there's much more fine detail. Let's keep this version.
25:05 The whole film ▶ play from here
Now let's watch the whole sequence. Click chain, so far.
That turned into a great little film. Just imagine what you could create with 16 panels, more characters, and more visual references. There's so much room to tell a bigger story.
26:35 Download in 2K & final thoughts ▶ play from here
Now let's download our finished film in 2K.
And that's it! From our first idea to a finished film. Start small, experiment, and refine each scene until it tells the story you imagined. Now it's your turn.
Bring your story to life with Proxima Art.