AI Image Generator for Beginners: Models, Settings and LoRAs Explained
A beginner's guide to the Proxima Art image generator: which AI model to choose, what Lite, Creator and Native 2K mean, how LoRAs and their weights work, and how to create the characters, creature and world for an AI film.

The video starts at 01:14, where this lesson begins. Watch the full 27:09 tutorial.
In this part of the video
Every AI film starts with its cast. Before you can build a storyboard or animate a scene, you need clear images of your heroes, any creatures they meet and the world they live in. In this lesson you will learn how the Proxima Art image generator works, which models exist and what they are good for, and how LoRAs change the look of your images. You do not need any prior experience: we will go through every setting you see on the screen.
What you will make: two heroines, a two-headed beast and a desert planet with two moons — the reference images for the short film Sleeping Sands of Kharuun. You will reuse them in the next lessons.
Where to find the image generator
Open the top menu Create and go to the generator. You will see Generate Images & Video with three tabs: Image, Video and Magic. Stay on Image. The page has four main parts, from top to bottom:
- Choose a Model — the AI model that draws your picture.
- Mode and quality settings — they change depending on the model.
- Prompt — your text description of the picture.
- Number of images, LoRAs, aspect ratio and Expert Settings, then the Generate Image button with its price.
Under the button you always see two balances: Daily Free Credits and Credits. Every account gets 100 free credits every day, and generations use the daily free credits first.
Which AI model should you choose?
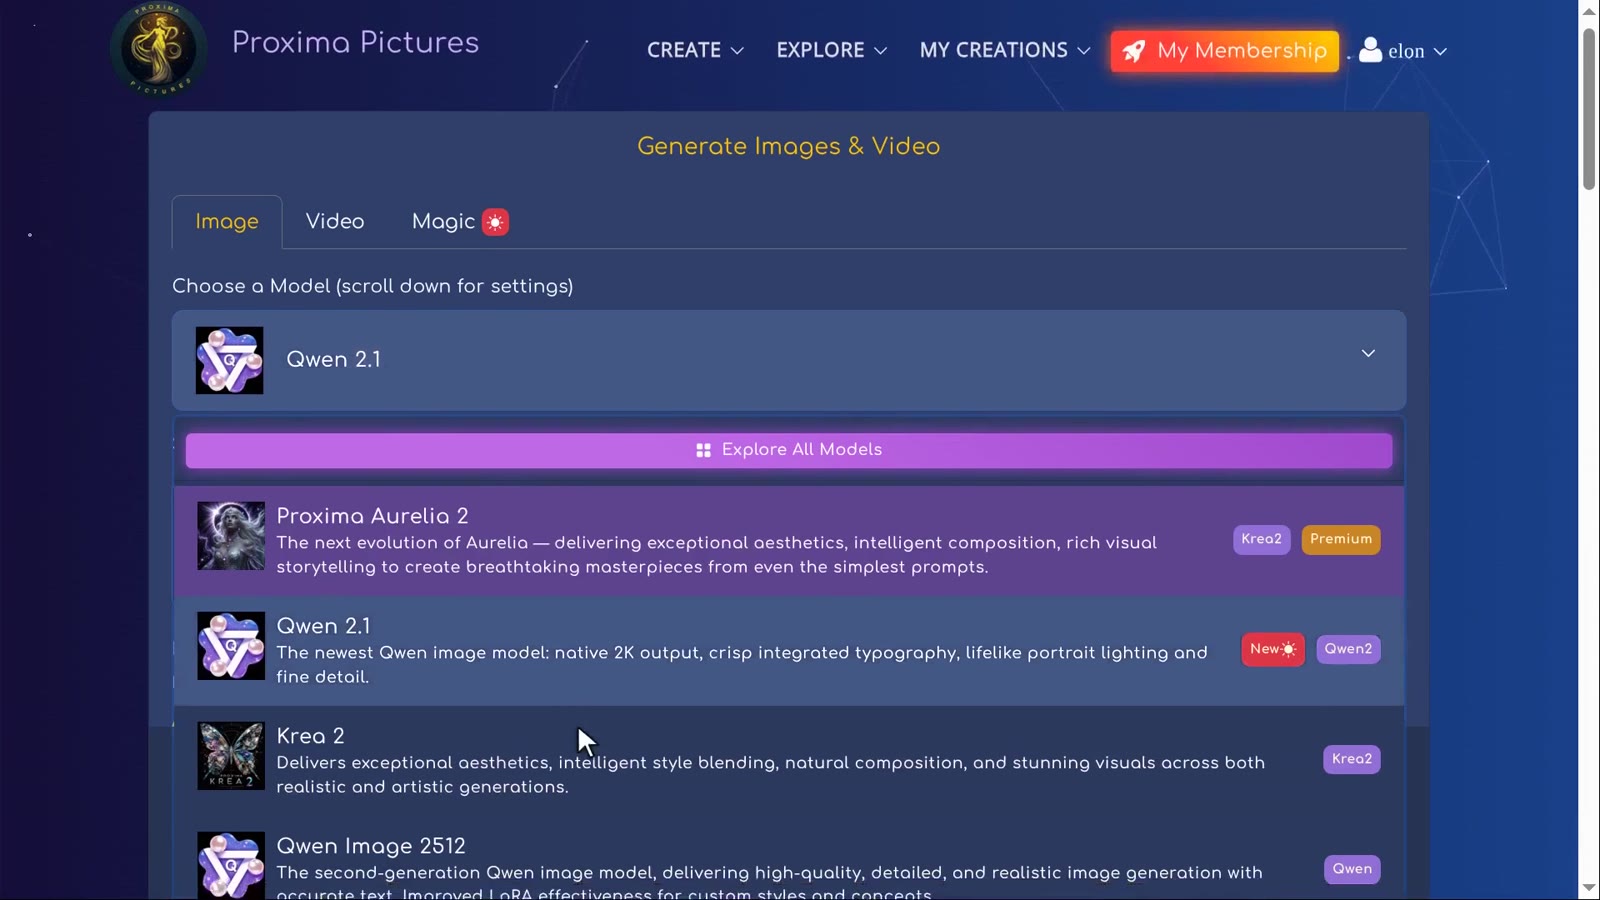
A model is the “artist” that turns your words into a picture. Proxima Art offers a wide selection, and each one has a different taste. Click the model field to open the list: every entry has a short description, and badges show if it is New or Premium. Explore All Models opens a page with examples for every model.
| Model | Good for | Price per image |
|---|---|---|
| Qwen 2.1 | Detailed characters, lifelike portrait lighting, readable text in images, native 2K output. Supports many LoRAs. Used in this tutorial. | 15 (Lite) or 20 (Creator); Native 2K costs more |
| Krea 2 | Natural composition and style blending, realistic or artistic. | 10 / 20 / 30 (Turbo / Standard / Master) |
| Proxima Aurelia 2 (Premium) | Rich, polished “masterpiece” aesthetics even from simple prompts. | 15 / 25 / 35 |
| Proxima Nova | Cinematic realism, illustration and concept art. | from 15 |
| Ideogram 4 | Typography, posters, graphic design and character sheets. | shown on the button |
| Z-Image Turbo, Ernie-Image Turbo, Flux Schnell | Fast, low-cost drafts and experiments. | 6–8 |
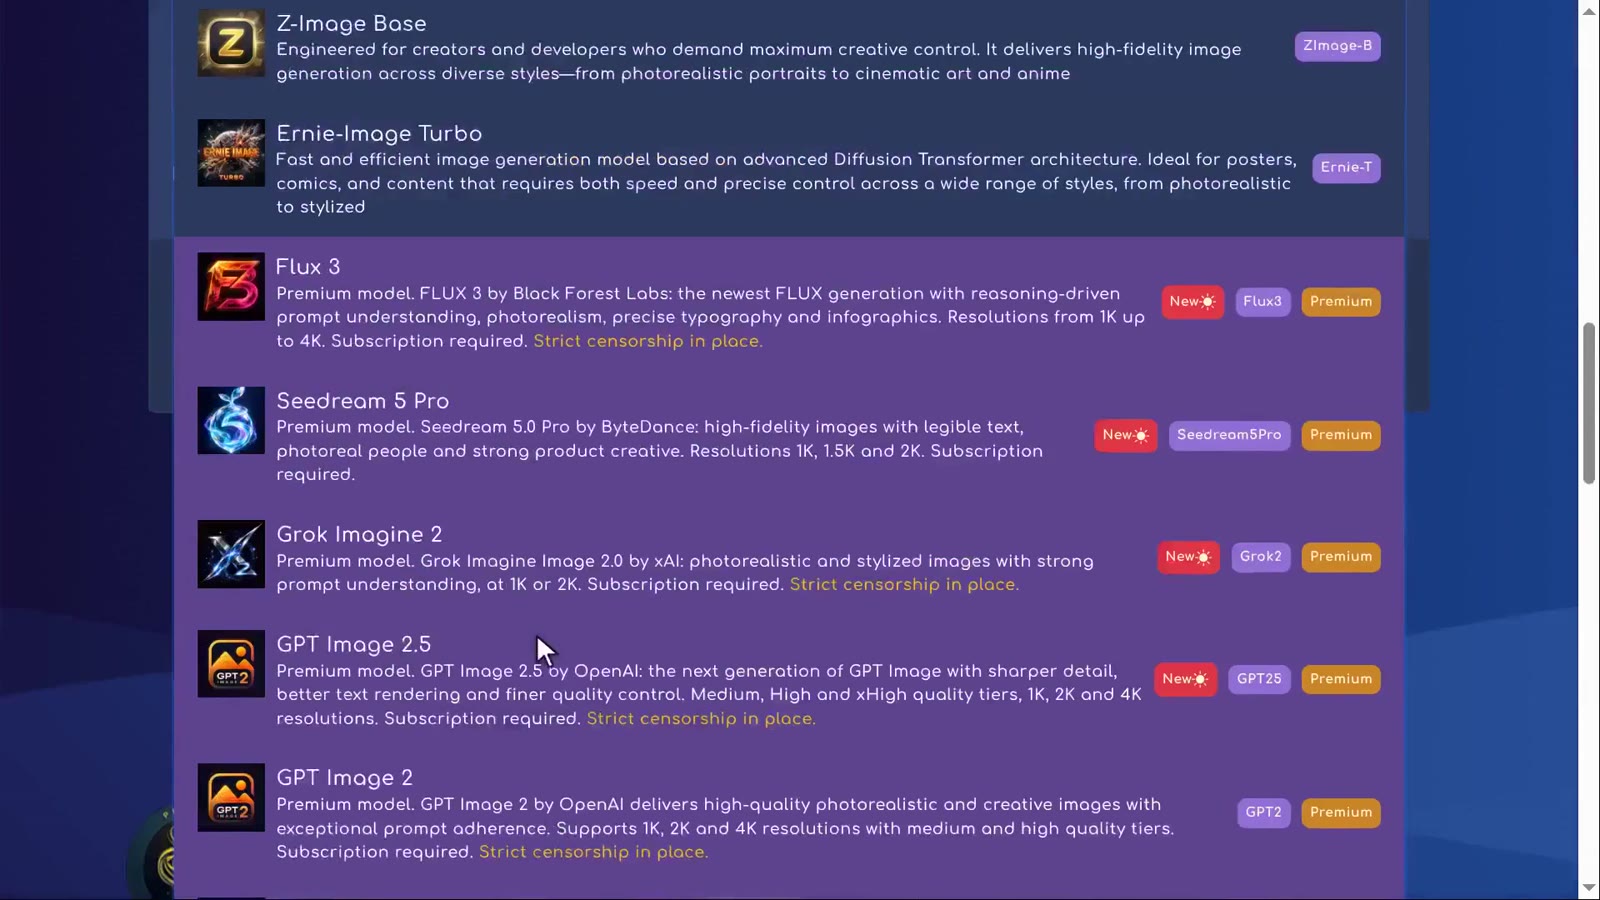
| GPT Image 2 and other Premium models | Very close prompt following and high-end quality; subscription required, some with strict content rules. | shown on the button |
Prices are in credits and can change; the Generate Image button always shows the exact total before you click.
Premium models and censorship
Models marked Premium need a subscription. Several of them — for example GPT Image 2, GPT Image 2.5, Flux 3 and Grok Imagine 2 — also carry the note “Strict censorship in place”: they refuse some subjects, such as nudity or graphic violence. If a model keeps refusing your prompt, switch to a model without that note.
Qwen 2.1 settings, one by one
This tutorial uses Qwen 2.1, so here is what each of its settings does:
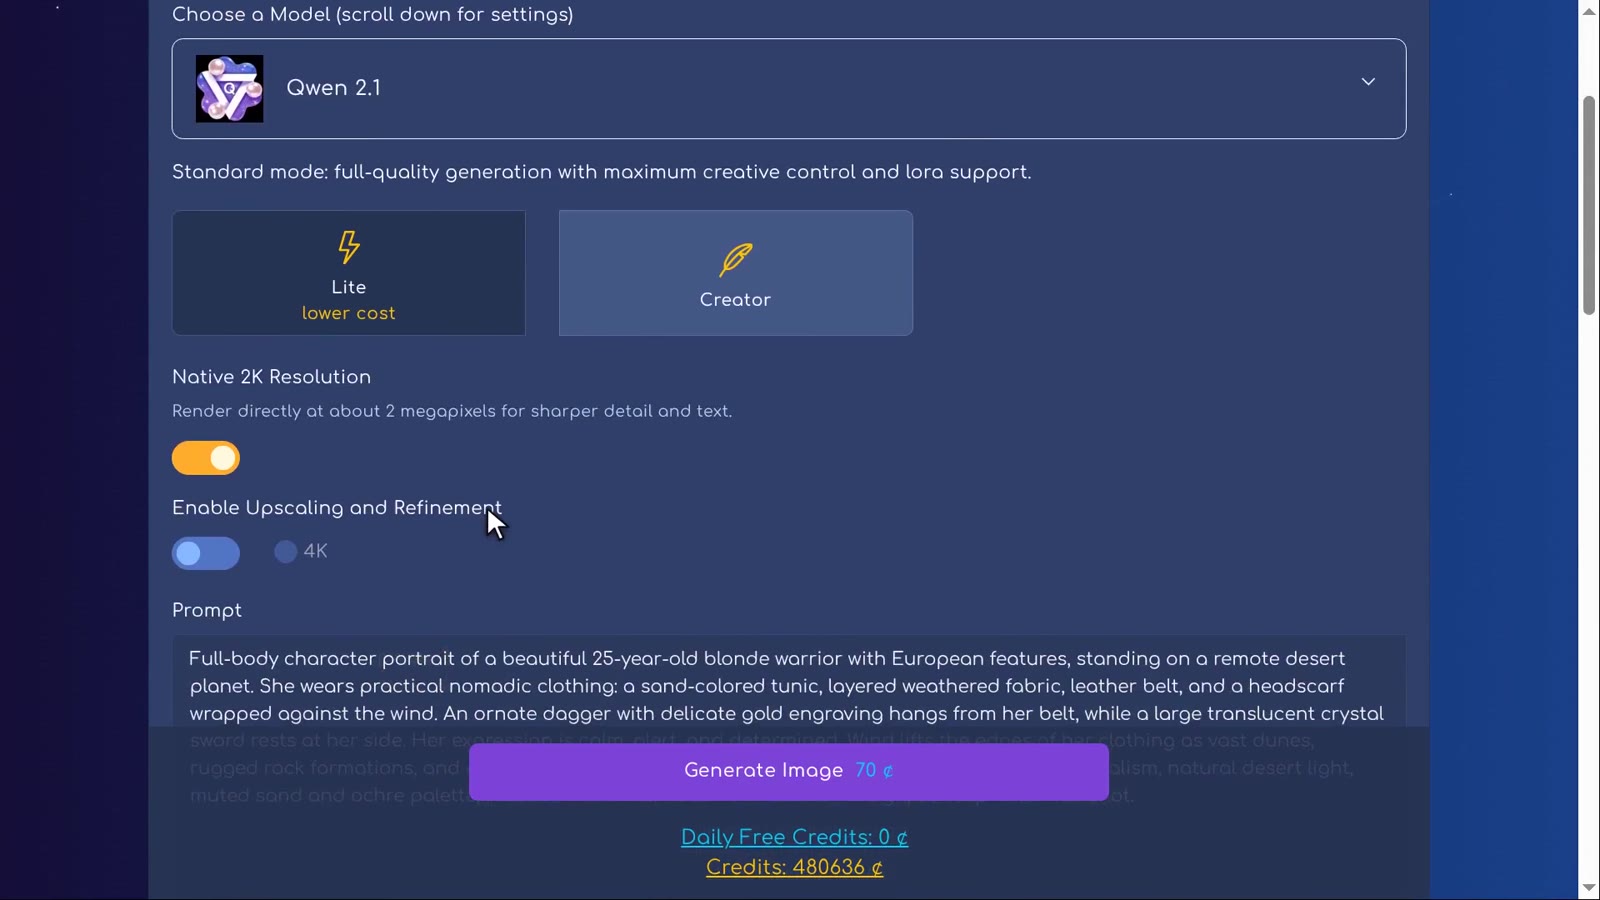
- Lite (marked “lower cost”) — an alternative way of generating with Qwen 2.1 at a lower cost, 15 credits per image. Results differ from Creator and are sometimes even better.
- Creator — full-quality generation with maximum creative control and LoRA support, 20 credits per image.
- Native 2K Resolution — renders directly at about 2 megapixels for sharper detail and text. It costs more and allows up to 2 images per click.
- Enable Upscaling and Refinement — enlarges the finished image (to 2K or 4K) and adds detail. With Native 2K on, only 4K is offered.
- Number of images — up to 4 per click. Two is a good habit: you can compare and keep the better one.
- Aspect Ratio — 1:1, 16:9, 9:16, 3:4 or 4:3. Use 16:9 for wide, film-like frames and 3:4 for full-body portraits.
- Expert Settings — seed, CFG, steps and sampler. Beginners can leave them as they are.
How to write a good prompt
A prompt is your description of the picture. The model only knows what you write, so be concrete. A reliable order is: shot type → who → appearance → clothing and props → setting → light and mood. In the video the first heroine starts like this:
Full-body character portrait of a beautiful 25-year-old blonde warrior with European features, standing on a remote desert planet. She wears practical nomadic clothing: a sand-colored tunic, layered weathered fabric, leather belt and a headscarf… An ornate dagger hangs from her belt, while a large translucent crystal sword rests at her side…
Notice that it describes one character in detail and says exactly what she carries. Those details matter later: the sword and the dagger become part of her identity in every scene.
What is a LoRA, and how do you use it?
A LoRA is a small add-on model. It does not replace the main model; it teaches it something extra — a visual style, a type of lighting, sharper details or a specific concept. Think of the base model as a painter and a LoRA as a set of special brushes and a style guide you hand to that painter.
Adding LoRAs
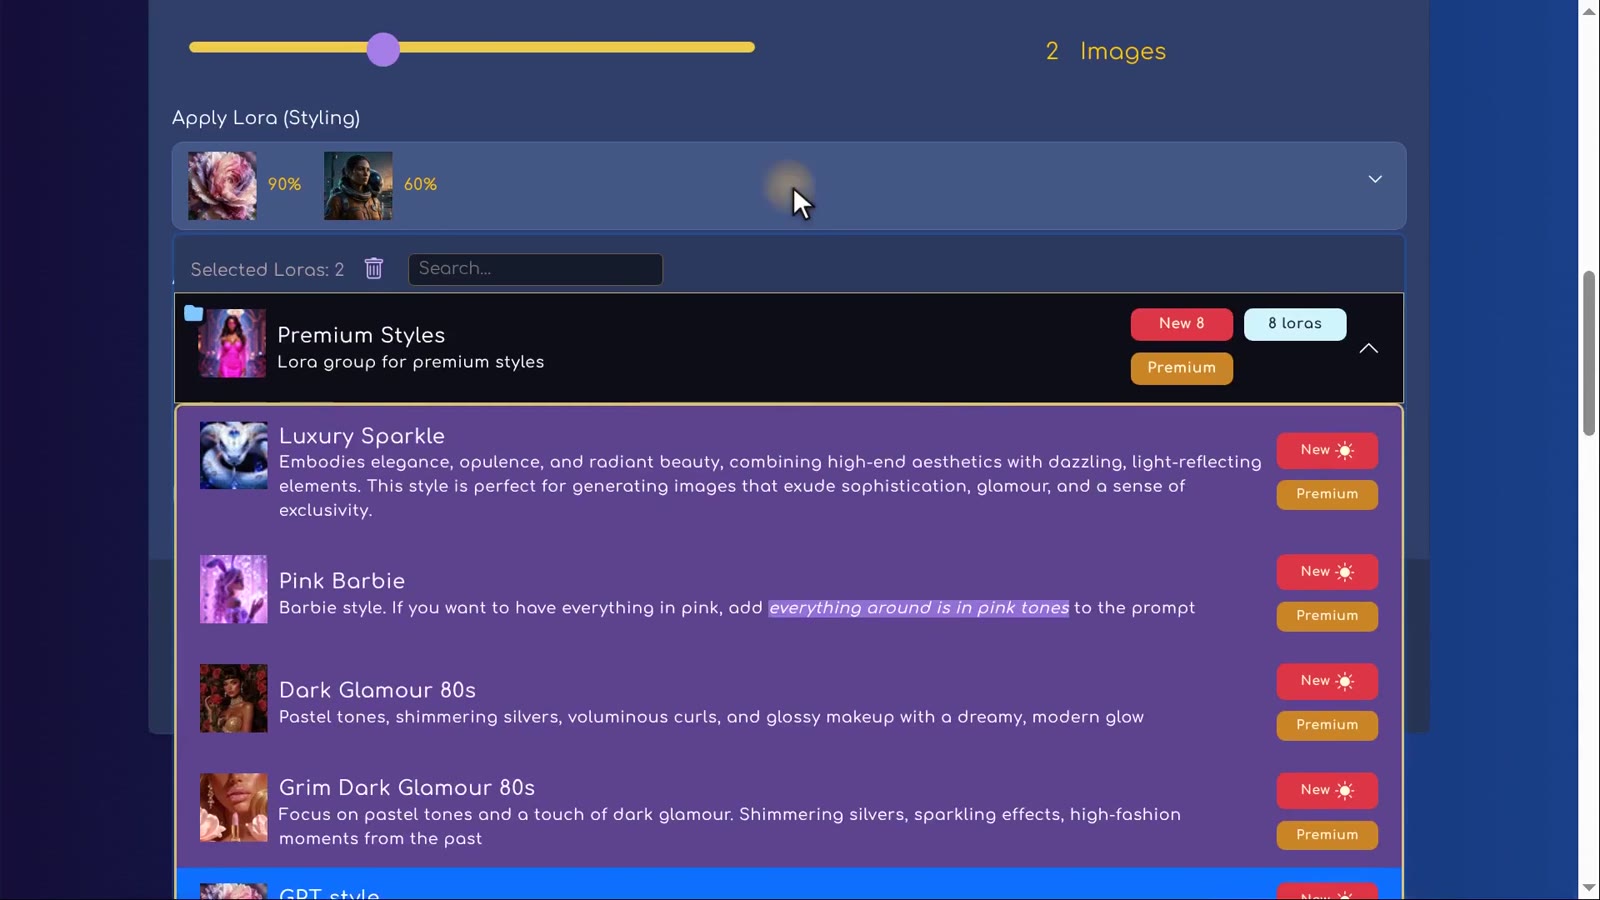
Open Apply Lora (Styling). You can search by name or open groups such as Premium Styles. Click a LoRA to add it; it appears at the top with its strength in percent. To remove all of them, use the bin icon next to “Selected Loras”. The list only shows LoRAs that work with the selected model — LoRAs are trained for one model family, so Qwen 2.1 has its own set.
A few LoRAs available for Qwen 2.1, to give you an idea:
- GPT style (Premium) — luminous celestial-fantasy style with gilded detail and cinematic glow. Used for our heroines.
- Fantasy Film Still Realism — pulls painterly fantasy toward believable cinematic photography; works best at about half strength.
- Cinematic Photo Lighting — dramatic, directional light and film-like colour.
- Epic Fantasy Illustration — majestic, storybook fantasy art.
- Qwen 2.1 Fix — repairs small mutations such as hands and fingers; it works best on its own because it weakens style LoRAs.
Choosing the strength (weight)
The slider under each LoRA sets how strongly it is applied. Each LoRA starts at a sensible default; the description sometimes recommends a range (for example “works best at about half strength” or “keep the weight below 60”). Some LoRAs are sliders that also accept negative values to push the effect the other way. In the video, two LoRAs are used: one at 90% and one at 60%.
The generator itself gives the most important rule: if your images turn out blurry, with heavy mutations or artifacts, look at your LoRA strengths. Reduce the percentage or remove some LoRAs. The more LoRAs you use, the lower the strength should be for each one.
How to pick LoRAs
- Decide on the look first (realistic, cinematic, fantasy illustration, anime) and choose one LoRA that matches it.
- Add a second LoRA only for a clear reason, such as better lighting or detail.
- Read the description: some LoRAs are made for editing photos rather than generating new images.
- Premium LoRAs need a subscription; without one they are switched off automatically.
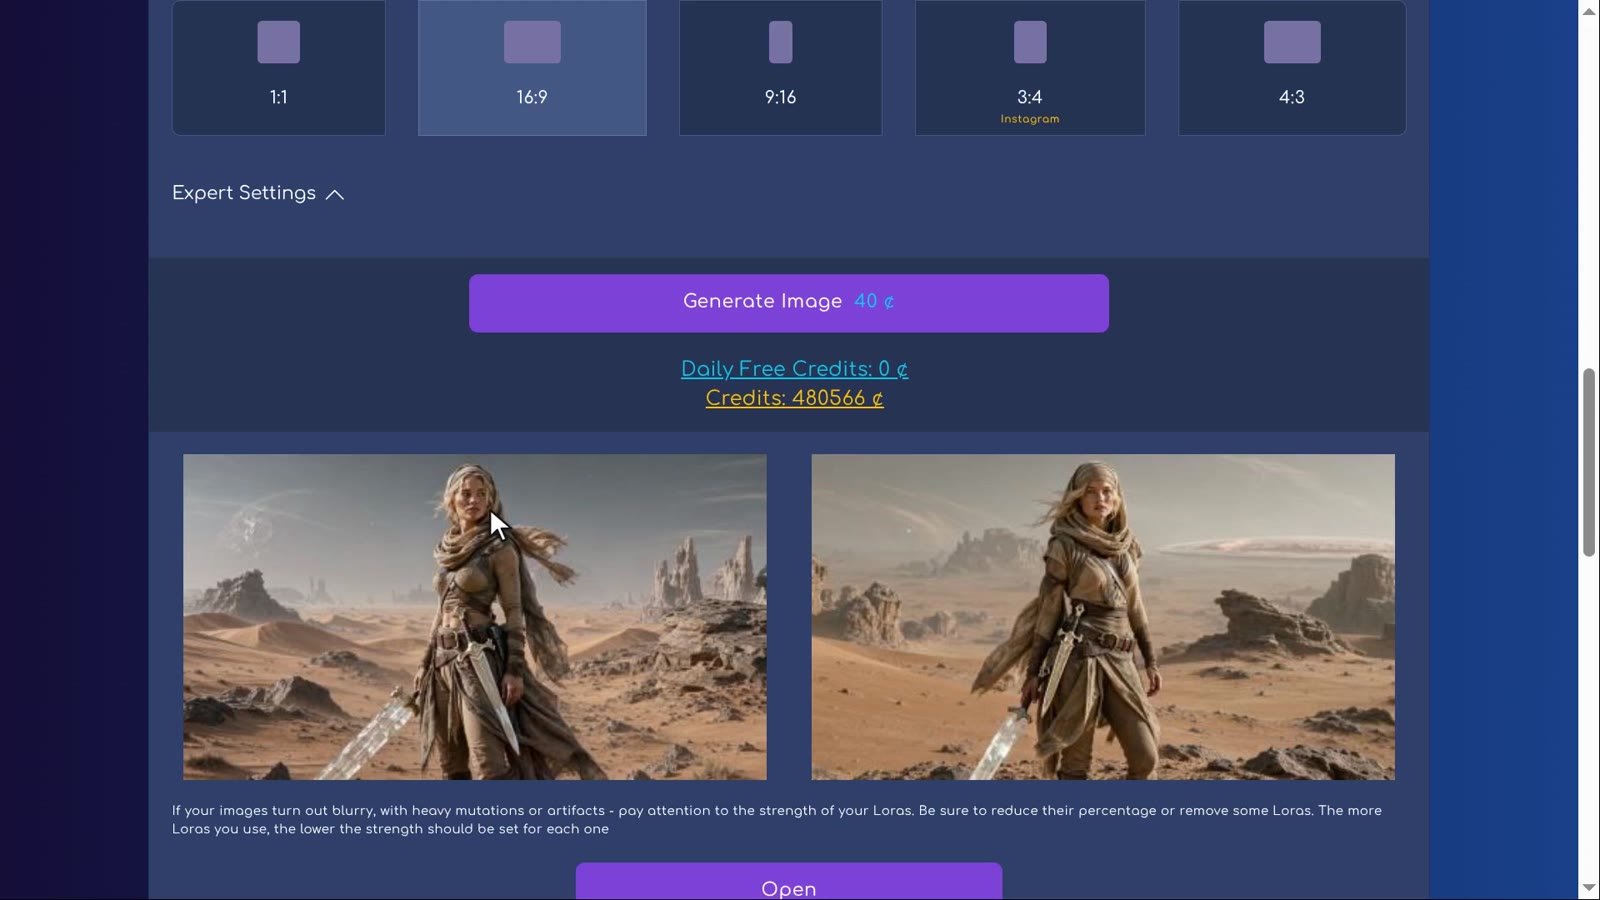
Step by step
-
Open the image generator
In the top menu choose Create, then the image generator (Generate Images & Video, Image tab).
-
Choose a model
Open the model list and pick one. For a film with consistent characters, Qwen 2.1 is a good start: sharp, detailed and LoRA-friendly.
-
Pick the mode and resolution
For Qwen 2.1 choose Lite to save credits or Creator for full control. Turn on Native 2K Resolution if you need extra detail.
-
Write your prompt
Describe one subject clearly: who it is, age, appearance, clothing, what they hold, where they stand and the light. Any language works, but be specific.
-
Add LoRAs
Open Apply Lora (Styling), search or browse the groups, click a LoRA to add it, then set its strength with the slider. Start with one or two.
-
Set the number of images and the aspect ratio
Generate two images per click to compare, and pick 16:9 for film-like frames or 3:4 for portraits.
-
Generate and review
Press Generate Image; the price is on the button. Keep the best result, adjust the prompt or LoRA strength and try again if needed.
-
Create the rest of the cast and the world
Keep the same model and LoRAs for every hero, creature and location so they share one look.
Tips for a consistent cast
- Keep the same settings for everyone. In the video the second heroine, the beast and the world are made with the same model and LoRAs, so they belong to one film.
- Make references, not final shots. The beast and the world only need to show what they look like; the storyboard will place them in scenes later.
- Describe one subject per image. A clean image of one character makes a much better reference than a crowded scene.
- Generate two at a time and keep the best. Your images are saved to your library, so you can pick them later in Character Asset Pack.
Common mistakes
- Too many LoRAs at full strength — the classic cause of melted faces and strange artifacts. Lower the weights or remove some.
- A vague prompt such as “a warrior girl” — you get a random warrior every time. Describe age, hair, clothing and props.
- Switching models between characters — the cast stops looking like one world.
- Fighting a censored model — if a Premium model refuses your idea, change the model instead of rewriting the prompt again and again.
Next, you will turn one of these images into a consistent, reusable character with Character Asset Pack.
How we used this in Sleeping Sands of Kharuun
The opening workflow creates four kinds of reference: Iraya, Ashara, the two-headed beast and their desert world. At 01:14 the tutorial introduces the image model and LoRAs; at 01:57 it continues with the companion, beast and environment. These are source images for the later character and storyboard steps, not the final animated shots.
Keep each reference readable: a character image should show the face and clothing clearly; a creature reference should make its two heads unmistakable; a world reference should establish the desert look. The later storyboard combines these ingredients into scenes. The examples above explain the workflow, rather than promising that a fixed seed or LoRA weight reproduces the exact film.
FAQ
What is a LoRA in AI image generation?
A LoRA is a small add-on model that teaches a base model something it cannot do well on its own: a style, a look, a type of detail or a concept. In Proxima Art you add LoRAs from the Apply Lora (Styling) list and set how strongly each one is applied.
What LoRA strength should I use?
Start with the strength the LoRA comes with and adjust in small steps. If images get blurry, distorted or full of artifacts, lower the percentage or remove a LoRA. The more LoRAs you combine, the lower each one's strength should be.
Which AI model is best for creating film characters?
There is no single best model, but Qwen 2.1 is a strong all-round choice: detailed, good with portraits and light, and it supports many LoRAs. Premium models such as GPT Image 2 follow prompts very closely but need a subscription and refuse some content.
How much does one image cost?
It depends on the model and settings. With Qwen 2.1, one image costs 15 credits in Lite mode and 20 in Creator mode; Native 2K costs more. The exact price is always shown on the Generate Image button before you click.
Can I use any LoRA with any model?
No. LoRAs are trained for a specific model family, so the list only shows LoRAs that work with the model you selected. If you switch models, check your LoRAs again.
Do I need a subscription to follow this lesson?
No. Qwen 2.1 and many other models work with the 100 free credits you get every day. Models and LoRAs marked Premium need a subscription.
Try it yourself: Image generator
Create images from text with Proxima models and LoRAs.All lessons in this tutorial
- 01:14 Lesson 1 · Generate your heroes, beast and world
- 02:32 Lesson 2 · Make consistent characters with Character Asset Pack
- 05:10 Lesson 3 · Set up the storyboard and let AI write the panels
- 07:30 Lesson 4 · Edit panels with tags, Craft and versions
- 10:17 Lesson 5 · Write your own prompts and compose the board
- 13:17 Lesson 6 · Turn the storyboard into your first video scene
- 16:07 Lesson 7 · Chain scenes into one continuous film
- 21:01 Lesson 8 · Reveal the sandworm, refine details and download